Commerce7 has welcomed 400+ wineries since acquiring WineDirect's SaaS division. Ready to migrate?
Understanding the CRM: Grow Your Sales by Creating Exceptional Customer Experiences
Karen Urquhart 9 min
Aug 24, 2022The Commerce7 CRM (Customer Relationship Management) gives wineries the tools they need to build strong customer relationships that help grow their business. How? The Commerce7 CRM connects and stores all of the data from your customers in one easily accessible location. It consolidates all customer communications, order history, reservations, club memberships, loyalty status, and notes/tasks associated with each customer. Your winery staff can access these individualized details anytime in order to deliver outstanding, personalized customer service which fosters brand loyalty, retention and an overall increase in profits.
Having a thorough understanding of the Commerce7 CRM is crucial to creating the best possible customer experience. In this blog post we’re going to dive into a simple and straightforward breakdown of the CRM to make sure you’re able to take advantage of all it has to offer.
Let's get started!
About the CRM
To access the CRM in Commerce7, you will need to login to your Commerce7 tenant. In the left hand menu, you will see an option for CRM under Dashboard.
The CRM is made up of 3 key sections:
- Customers
- Individual customer records
- Notes & tasks
CRM Breakdown
Customers
To access the Customers section of the CRM, you will need to navigate to CRM > Customer in your Commerce7 tenant:
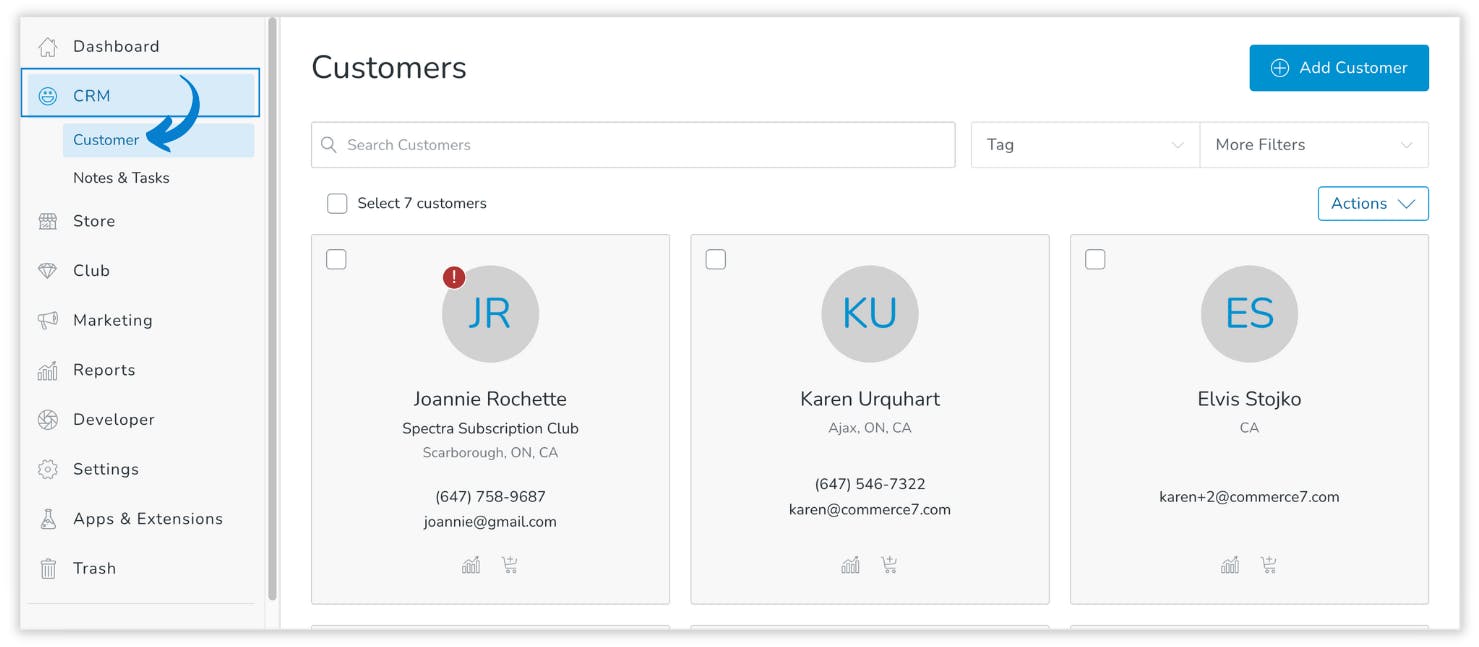
- Individual customer records display on this page, with an overview showing customer name, club membership(s), location, phone number and email.
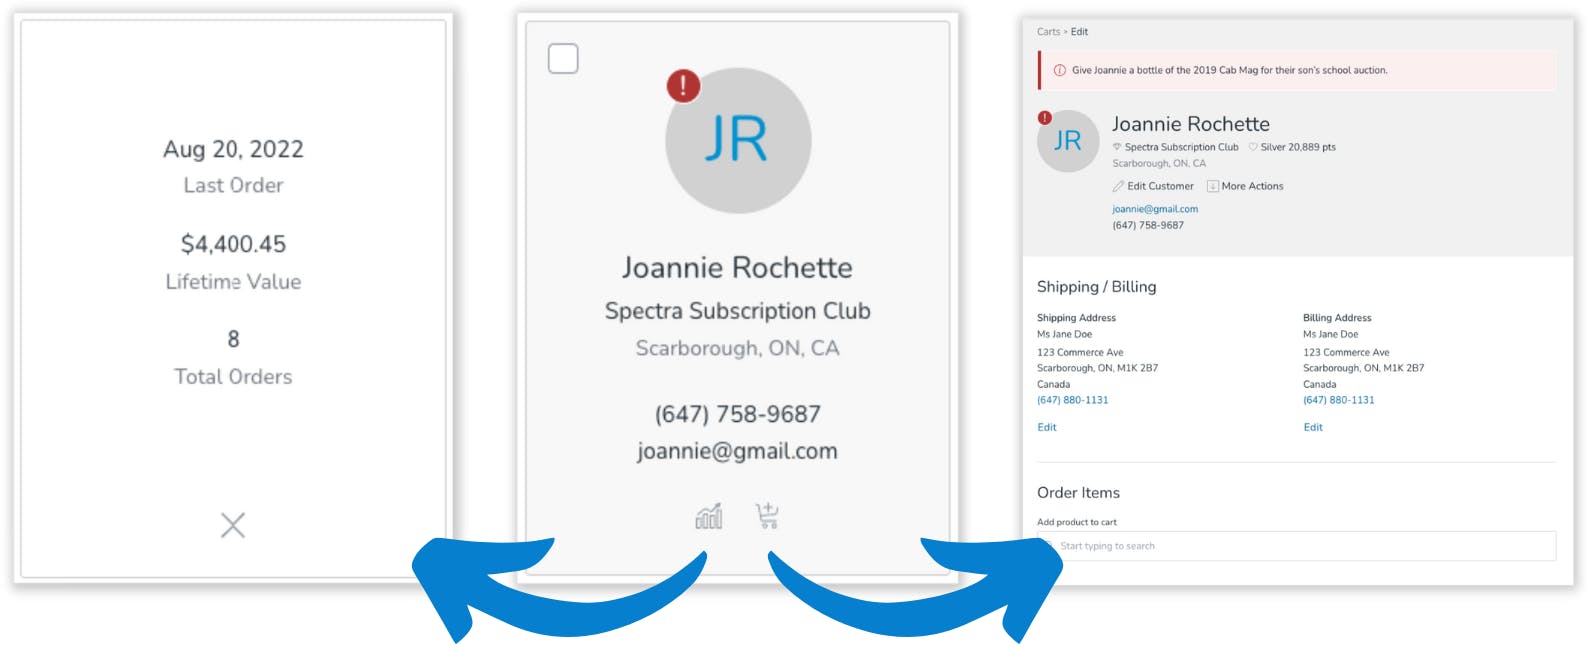
- On each customer card, you can click the data icon to see their last order, LTV and total orders at a glance, or click the shopping cart icon which will bring you to their profile where you can instantly create an order for the customer.
Alerts
- Some customers may have an alert beside their profile icon (red circle with white exclamation point), and if you click on the alert icon, you will see at a glance what it is (For example: Order 123 is awaiting pickup)
- These alerts help remind admins what tasks need to be completed for the customer, or any issues that the customer is experiencing (For example: Card declined).
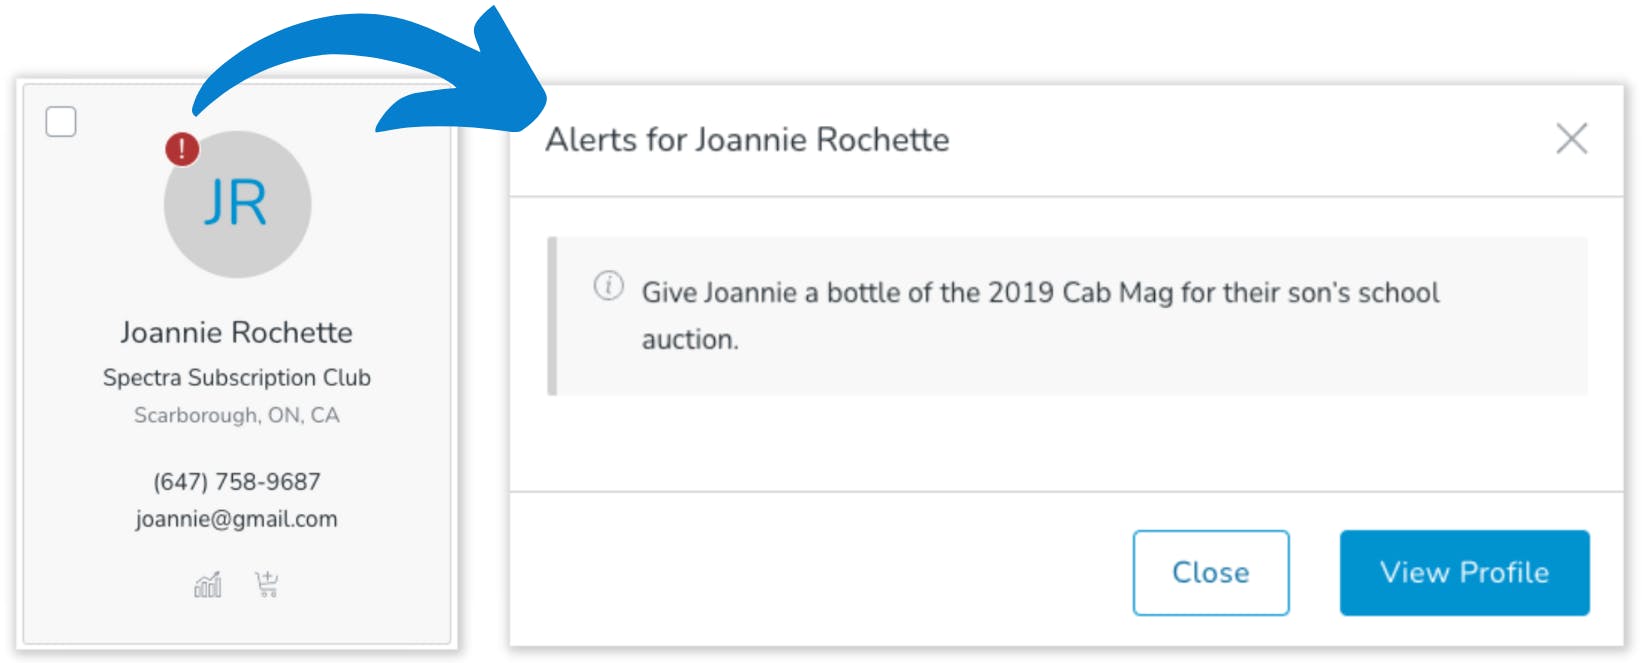
We will go over how to create alerts (Also referred to as notes, tasks, or flags) later!
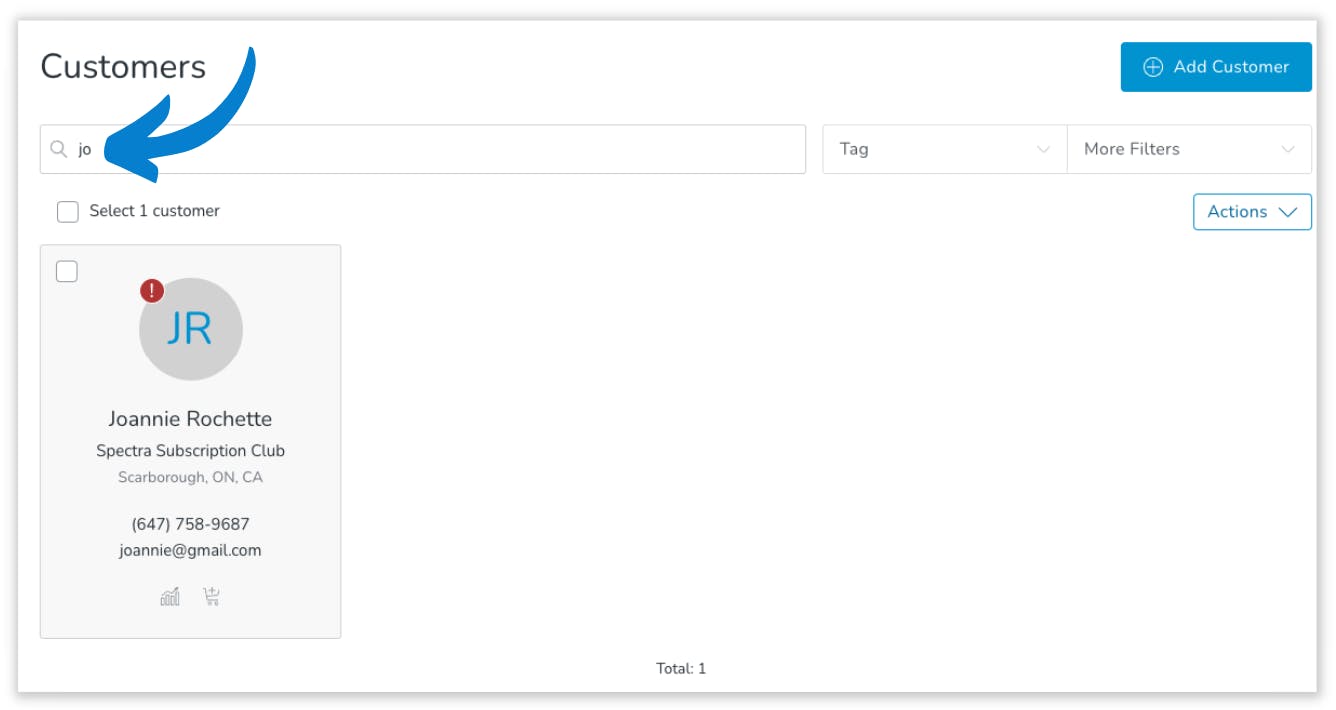
Search
- The search bar is a wild card field meaning you don’t have to put in the entire customer name or email address to successfully search for them. After entering some of the name or email, the system will search for all matching customers.
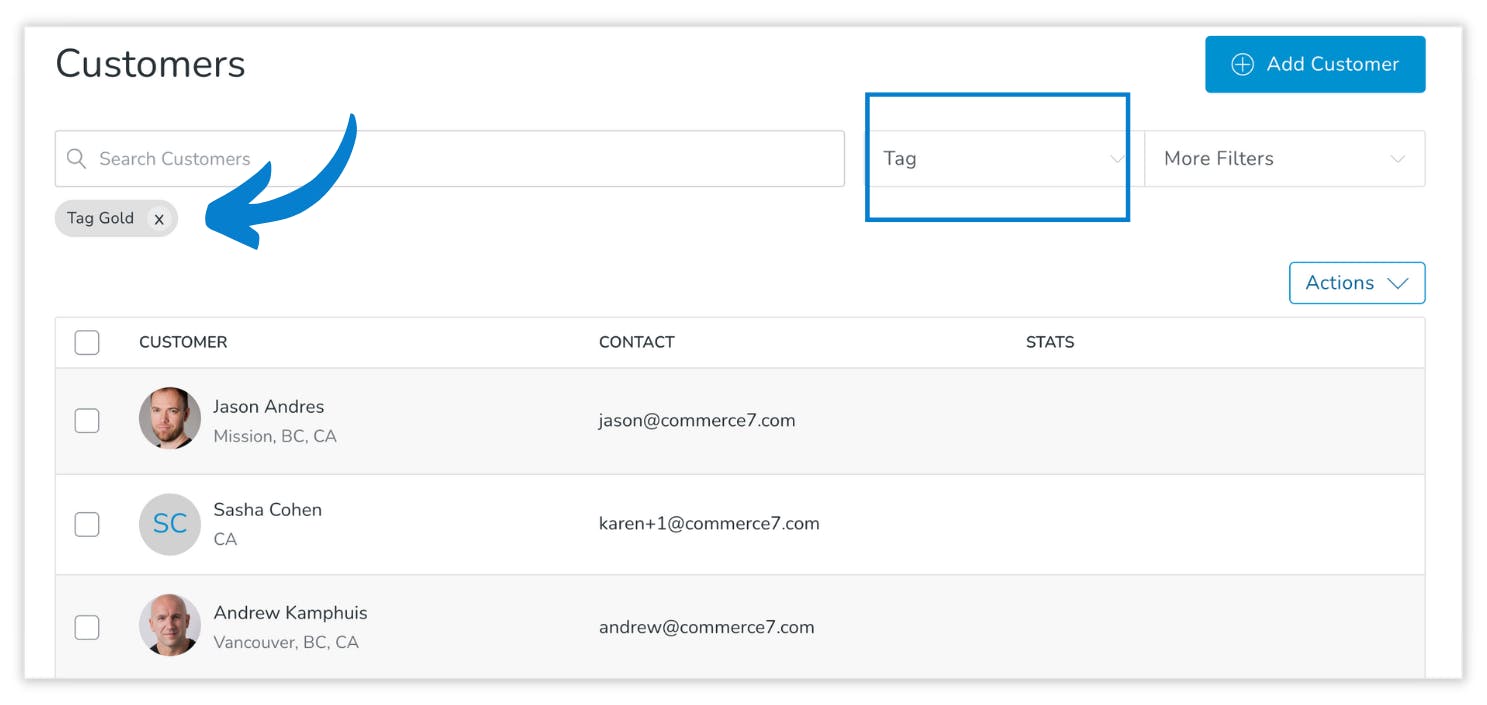
Tags
- You can use existing tags to filter your list of customers.
- Check out our documentation to learn how to create tags in Commerce7.
- Any customers that are tagged with the tag you select from the drop down list will appear.
- At the bottom of the page it will show you the number of people within that filtered list as well.
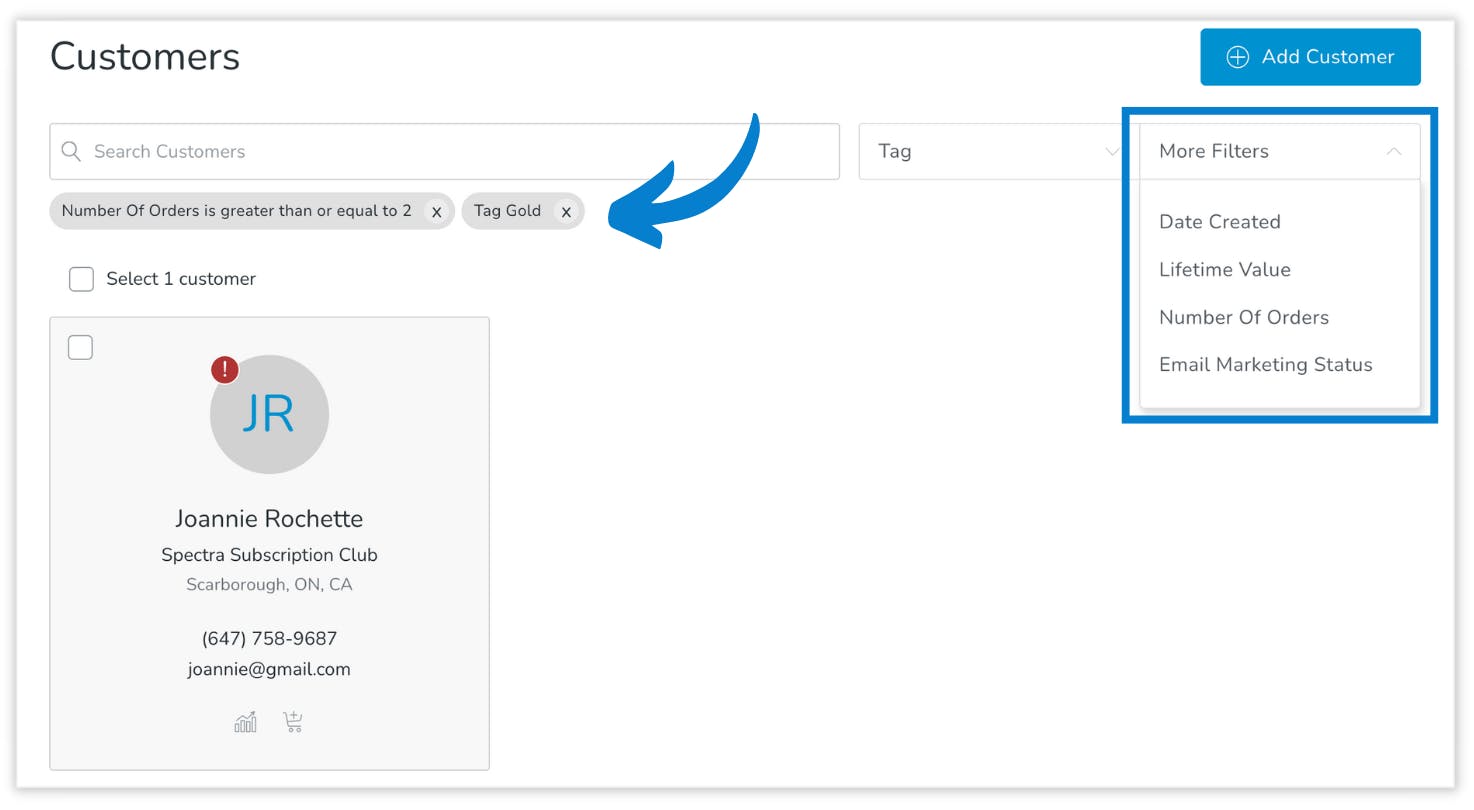
More Filters
- In the More Filters drop down, you will see the following options: Date created, LTV, Number of orders, Email marketing status
undefinedundefinedundefinedundefined - Note: You can apply more than one filter at a time. The filtering will take into account all filters you apply and only display customers that meet ALL filtering criteria.
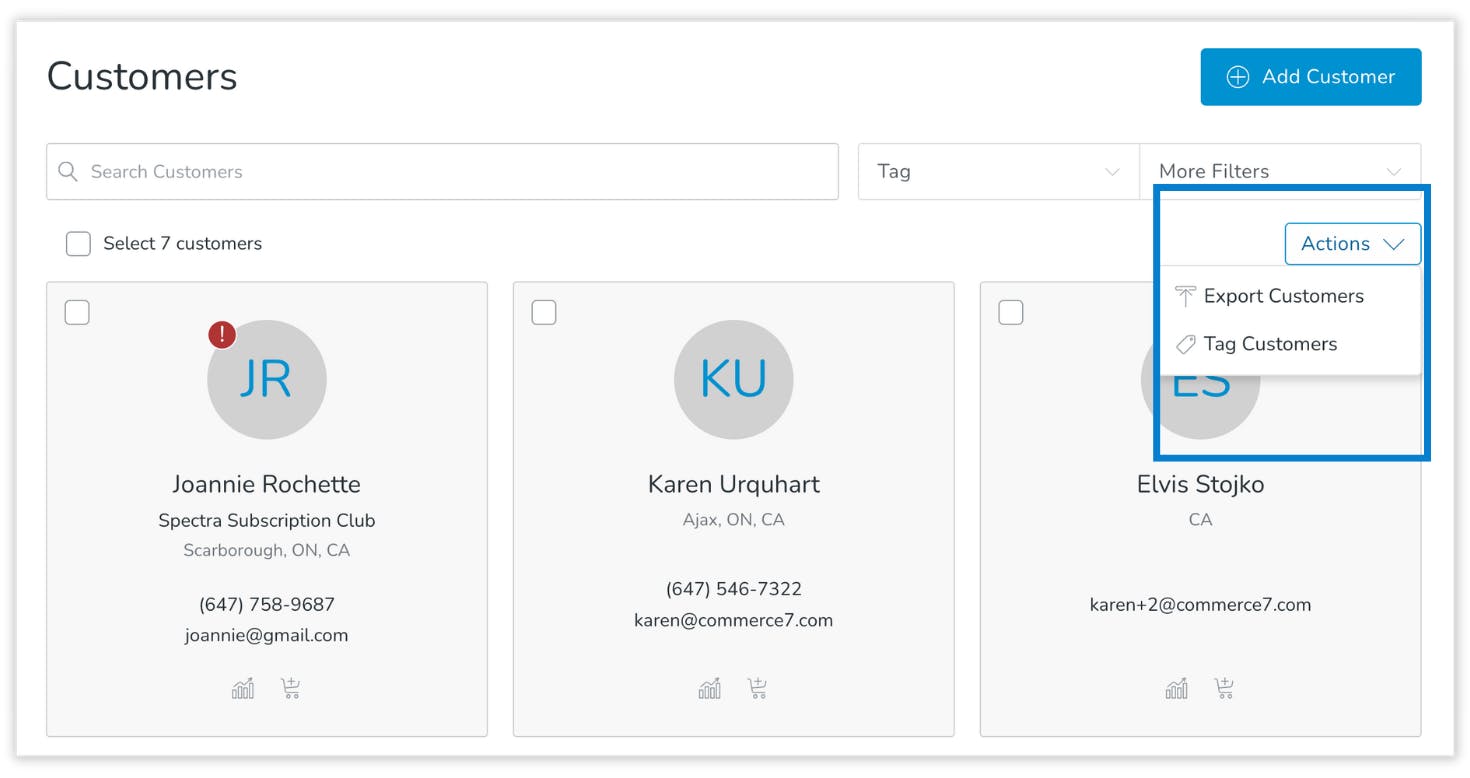
Actions
- In this dropdown you will see two options: Export customers and Tag customers
- You can use the tag function to tag a very specific group of customers with an existing tag. For example: You want to tag customers as VIP’s if they have placed more than 10 orders and their LTV is greater than $1000.00. You can use the More Filters option to filter customers by number of orders placed and LTV, and then use the Actions > Tag Customers function to tag the customers that met your criteria as VIP’s.
- You can use the export function to export your full customer list or filtered customer list. This will email you the export, or you can click on the blue text that says “Bulk actions page” where you can download it right to your device as well.
Individual Customer Records
You can click into an individual customer record from the customer list, which will open up a full overview of that customer.
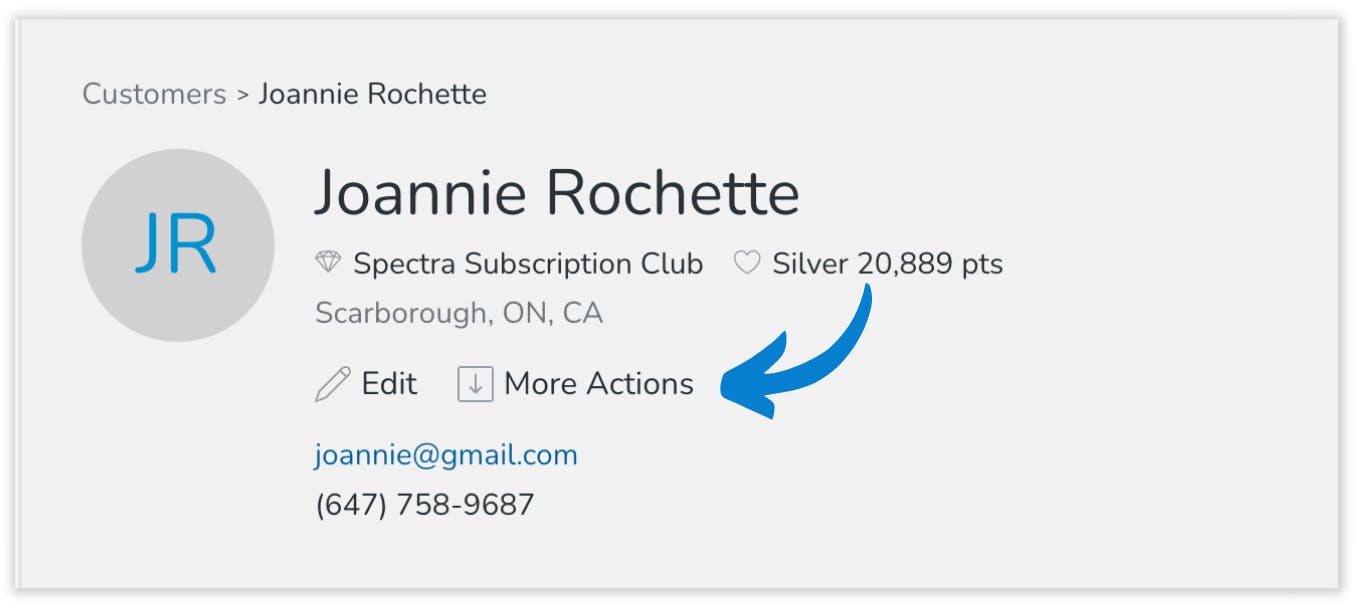
- At the top of the record, you’ll see a summary with customer name, club membership, loyalty tier, location and contact information. You can use the Edit button to instantly edit this information.
- More actions gives you the option to see edit history (This is useful if you want to see who made a change to a customer record and when), send account activation email, send reset password email, send Magic Link email, merge customers or delete the customer.
Unique features:
- You can have multiple email addresses associated with one customer record. If you click Edit you will have the option to add multiple emails. All emails associated with the customer record can be used to login to the customer account, and both emails can be searched to bring up the customer record. This feature is especially handy when both spouses want to receive club marketing or club transaction emails.
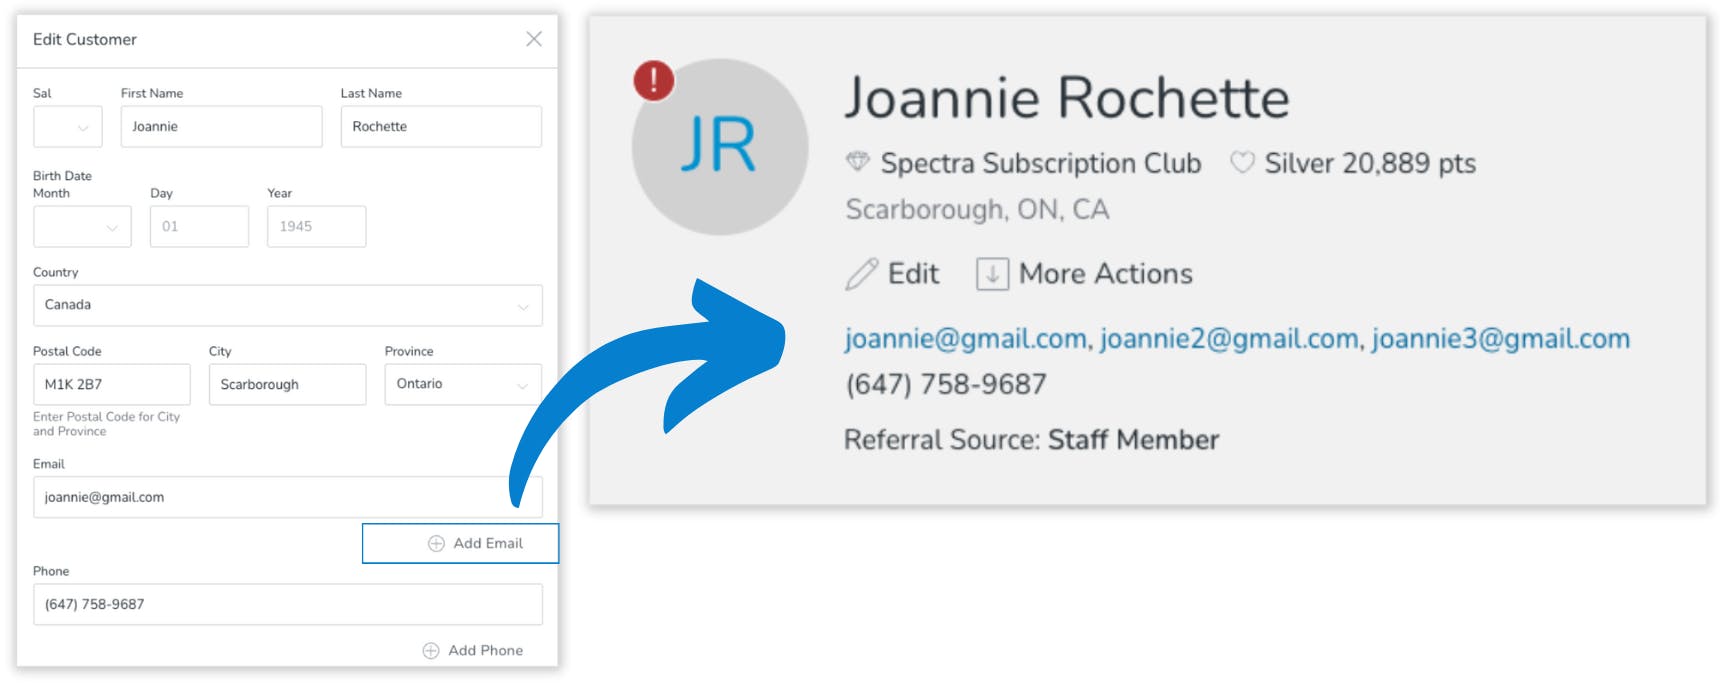
- You can create custom attributes that are most relevant to your winery. If the attribute has data in it, it will appear in the summary of the customer record. For example: If you like to keep track of how the customer was referred to your winery, you can create a custom attribute called "Referral Source", where you can type in how they were referred. This data will then appear in the customer summary at the top of the customer record:
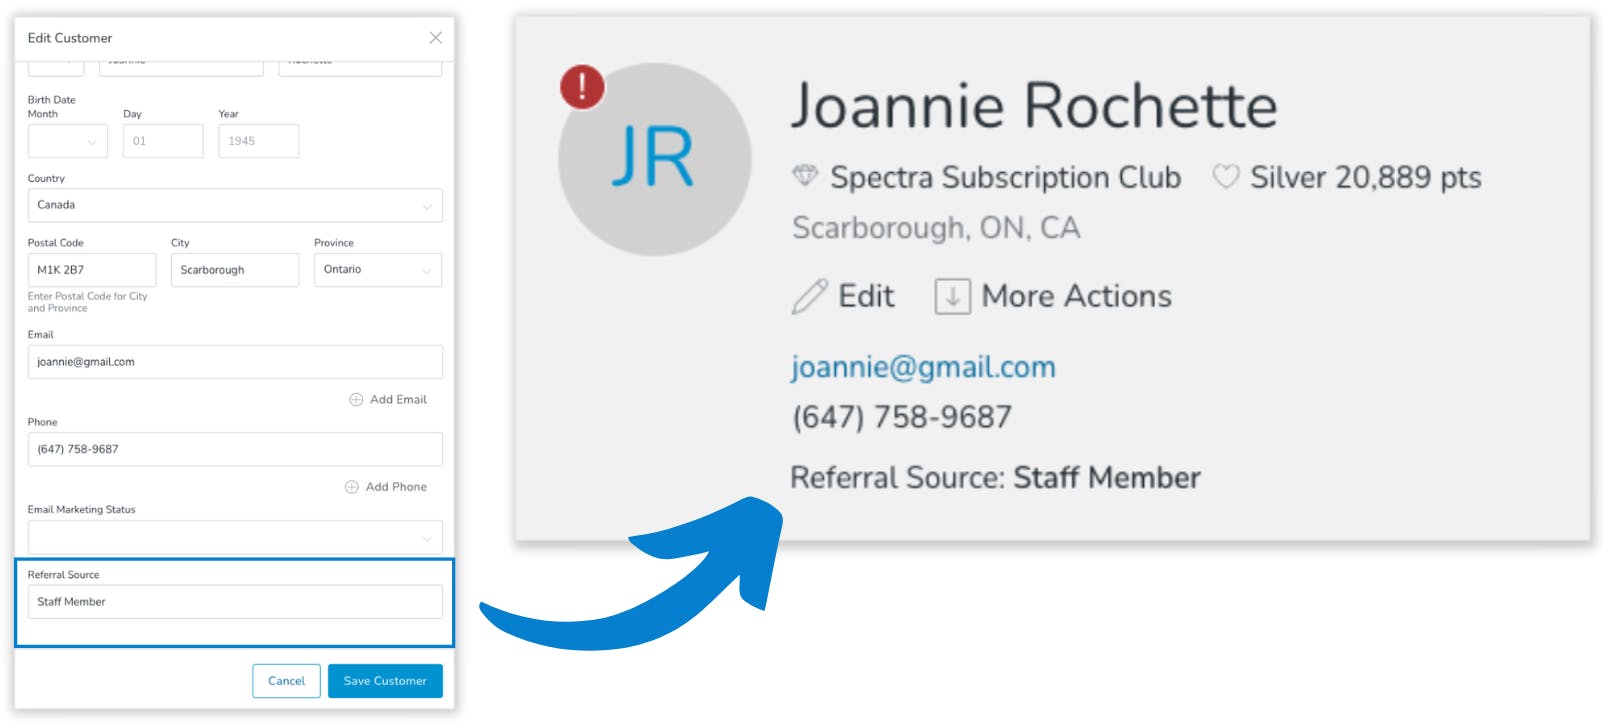
Below the summary, you will see a submenu with the following categories: Overview, orders, profile, Reservations, notes/tasks, emails & Loyalty (if applicable).
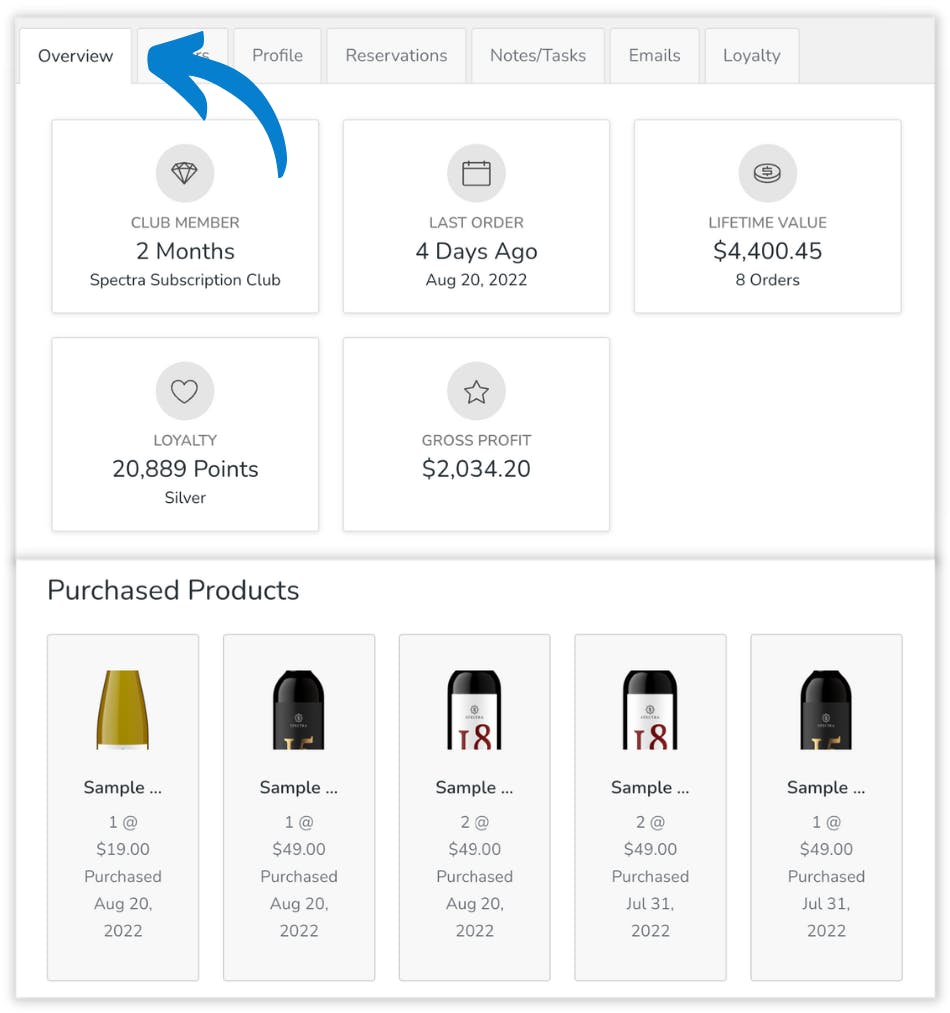
Overview
- The overview tab will give you insight into who this customer is to your organization. You can see club membership(s), last order, LTV, loyalty points and gross profit to the winery.
- You will also have access to a list of wines/products they have purchased in the past so you can see their favourite wines at a glance.
Orders
- The orders tab lists all of the customers orders. When you click into one of the orders, you will be brought to the order summary page where you can get a more detailed view.
- You can also add an order from this tab which is great for orders you receive over the phone.

Profile
- The profile tab has its own submenu with the following options: Club memberships, Allocations, Addresses, Credit cards
- Club Memberships will show clubs the customer is a part of with associated billing information. You also have the ability to add a new club membership from here.
- Allocations will show which allocations they are a part of with the option to add an allocation order.
- Addresses will show all addresses they have on file. You can select the default address by clicking Edit under one of the addresses and checking off the Default address box. You have the option to add or delete additional addresses here as well.
- Credit Cards are similar to addresses. You can set the default card and add or delete any cards that are not applicable.

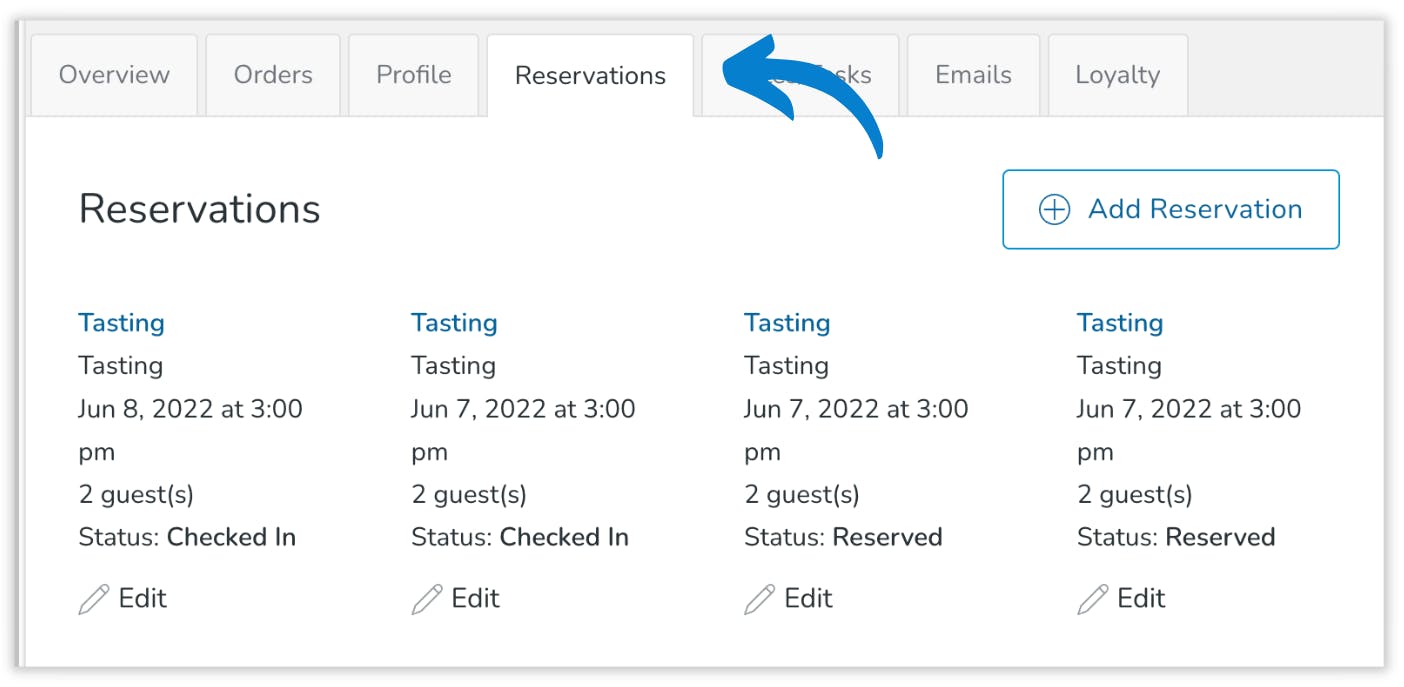
Reservations
- Past and upcoming reservations will appear under this tab. You can edit an existing reservation, or add a new reservation within this tab as well.
Notes & Tasks
- This tab will display all notes, flags and tasks associated with the customer.
- We will get into the details of Notes & Tasks below.
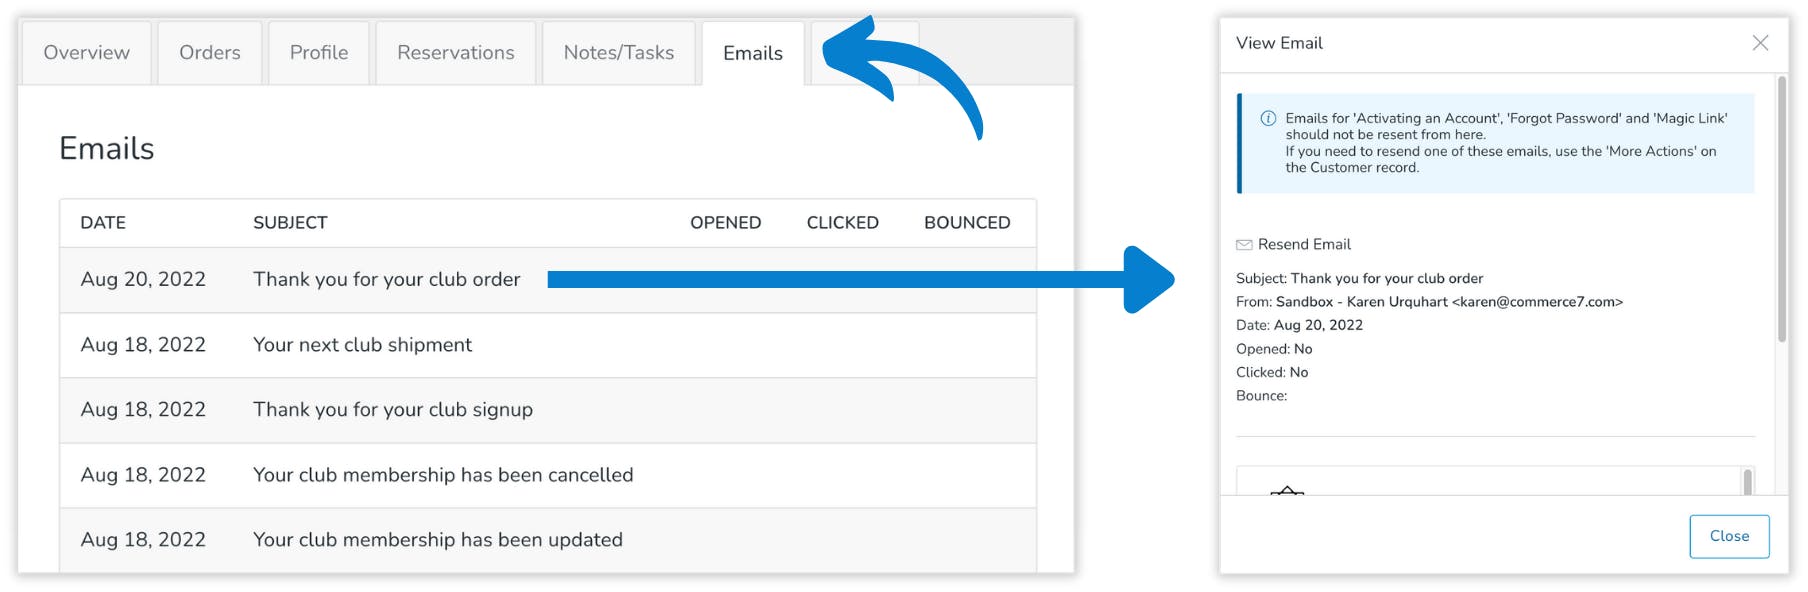
Emails
- This tab will show all emails the customer has received from your business. You will also be able to see if the emails have been opened, clicked or bounced at a glance.
- You can click into any of these emails to view them, which will show you the subject, who it was from, the date sent, if it was opened, clicked or if it bounced and the content of the email.
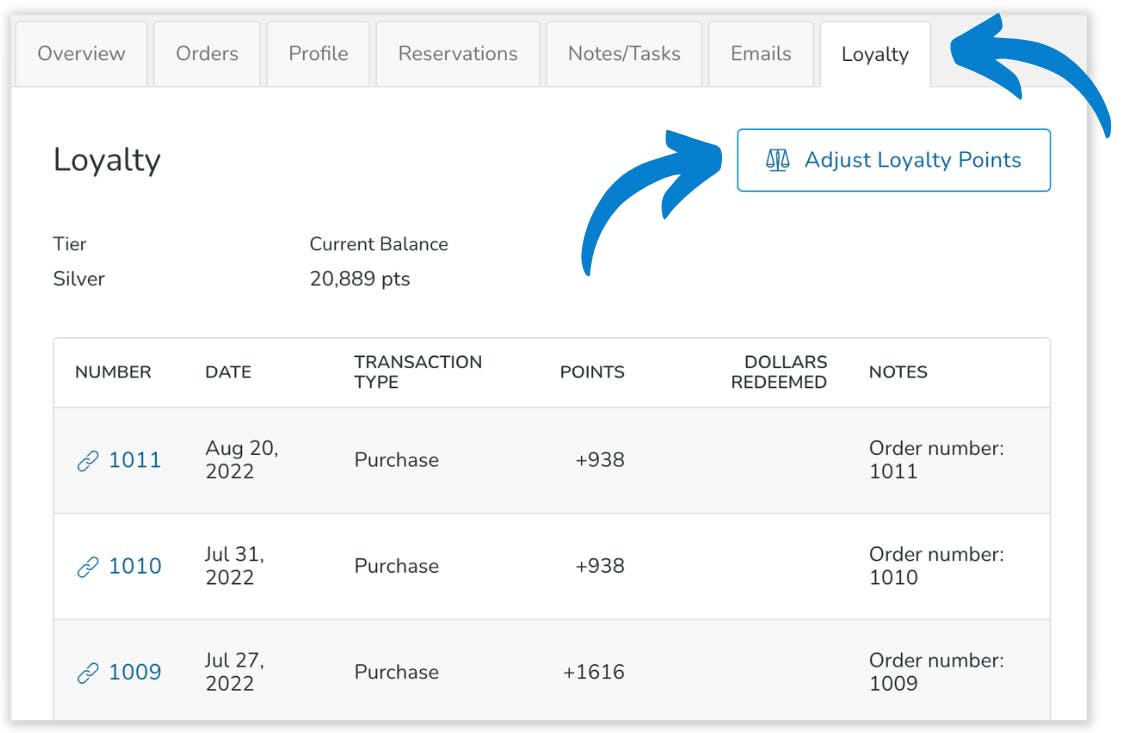
Loyalty
- If you have loyalty enabled, you will see a summary of the customers loyalty status in this tab - you can see order number, date, transaction type, number of points earned, or redeemed and any notes.
- You can also manually adjust customer points by clicking the Adjust loyalty points button.
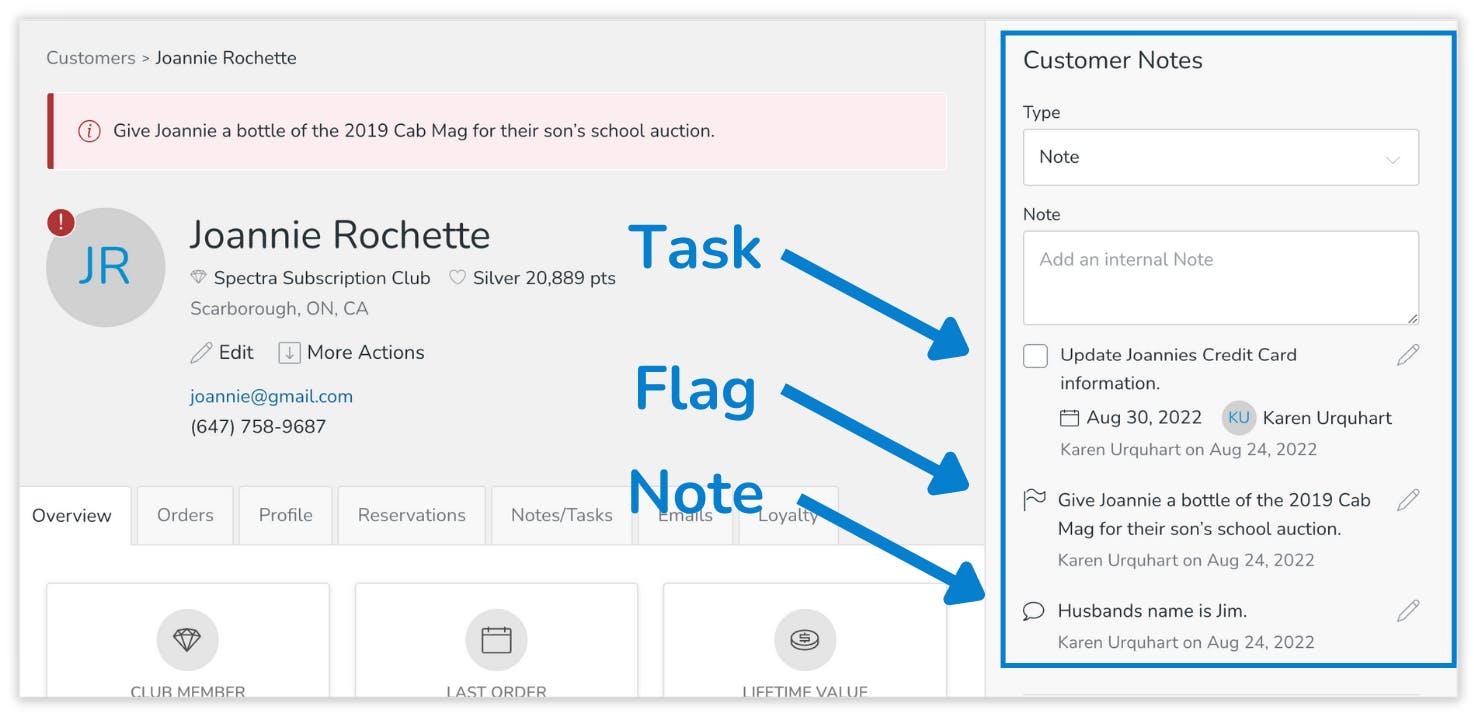
Customer Notes (Right hand column)
- There are three types of notes: Note, Flag & Task
- Any notes/tasks you add here will appear in the Notes/Tasks tab in the customer profile.
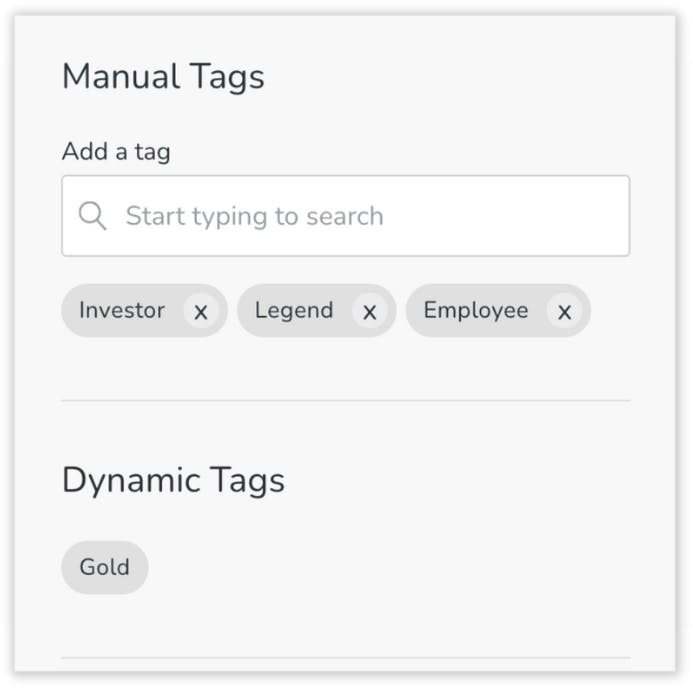
Manual & Dynamic Tags (Right hand column)
- Any manual tags you created in settings > tags that the customer has been tagged with will be visible in this section.
- You can either apply additional tags to the customer, or click the x beside an existing tag that was applied to the customer to remove it.
- Any dynamic tags that have been automatically applied to the customer will appear in this area.
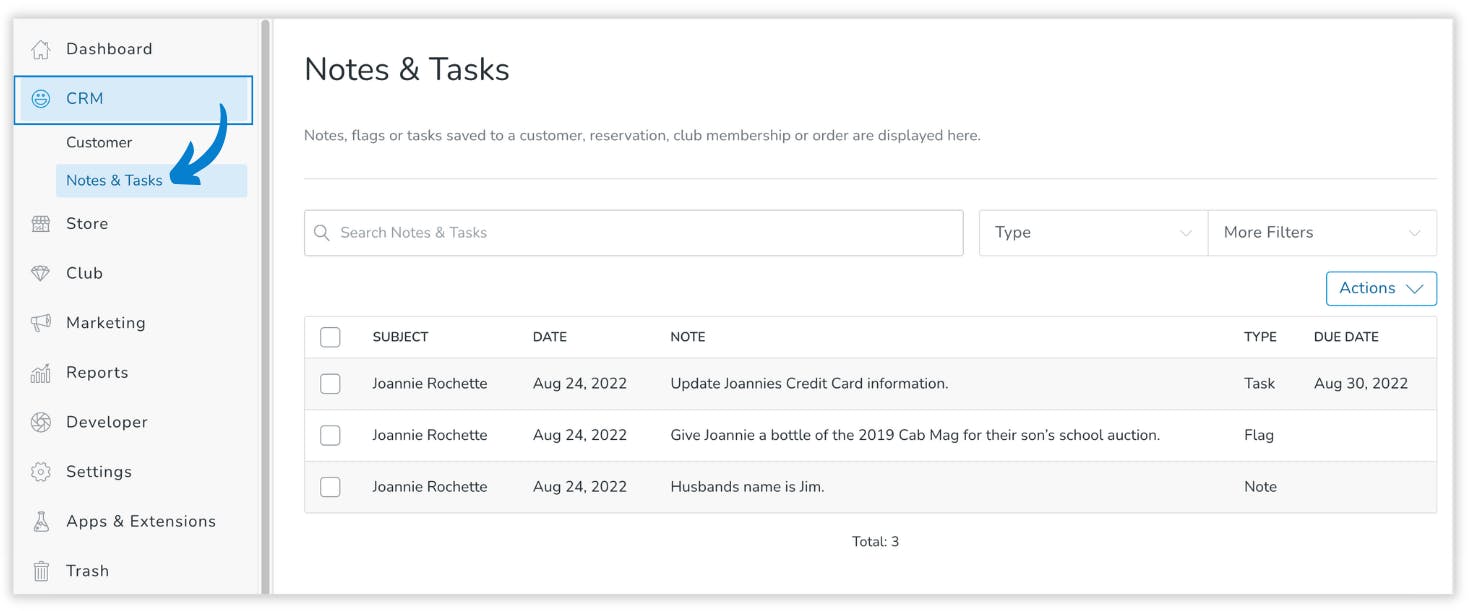
Notes & Tasks
- To access the dedicated Notes & Tasks section, you will need to navigate to CRM > Notes & Tasks in the left hand menu of your Commerce7 admin.
- You will see a master list of all of the notes, tasks & flags you have created for all customers in this section of the CRM.
- Just like the customer list, you can search for specific notes and you can filter by type (Note, Flag, Task).
- You can also click More Filters to filter by note date, due date, task completed or task assigned to.
- You can apply more than one filter at a time. The filtering will take into account all filters you apply and only display notes/Flags/Tasks that meet all filtering criteria.
- You also have the ability to export your notes & tasks by going to Actions > Export Notes & Tasks.
There you have it! A full breakdown of the CRM feature in Commerce7. Want to see the CRM in action? Check out our recent Free Training Friday Video.
References
https://hbr.org/2000/07/e-loyalty-your-secret-weapon-on-the-web
Ready to create better shopping experiences?
See Commerce7 firsthand by scheduling a demo with our team.
Schedule a Demo